Colourful Year of Cheer

By | 22/11/2017

When I first saw the Year of Cheer Specialty Designer Series Paper I absolutely love it.  And when I discovered that it could be sponged any and all colours that made it even better.  I then started to think besides cards what else could I do.

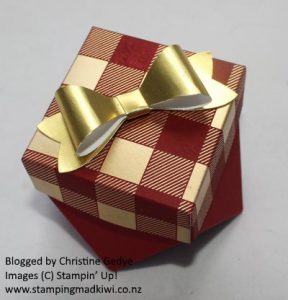
This faceted box made using the Gift Bag Punch board sprung to mind.  I feel that the gold and Cherry Cobbler Combination looks so elegant.  With a little card to finish it off and you are set with a lovely gift.

I must admit that I like the rich regal colours the best with this DSP.  I have also tried Night of Navy which also looks fabulous.

If you prefer the colour a little less intense then sponge it more lightly.   The choice is yours.  What about a rainbow or ombre effect.

Happy stamping!

Christine

If you live in New Zealand all supplies used to create these projects can be purchased HERE.

Supplies used:
Specialty DSP:  Year of Cheer (2017 Holiday Catalogue)
Stampset:  Hearts Come Home
Cardstock:  Cherry Cobbler, Gold Foil, Whisper White
Ink:  Cherry Cobbler
Miscellaneous:  Tombow Multipurpose Liquid Glue, Gift Bag Punch Board,  Stampin’ Trimmer, Dimensionals, Layering Ovals, Layering Squares, Simply Scored Scoring Tool, Bow Builder Punch, Big Shot, Sponges.

Introducing the Stampin’ Up! Stamparatus

By | 16/11/2017

What is a Stamparatus you ask?  It is Stampin’ Up!’s innovative stamp placement tool.  Developed in conjunction with some of our leading demonstrators.

The Stamparatus allows you to:

  • Make multiples with ease
  • Consistently stamp crisp, clean images
  • If you want a darker impression, apply more ink and restamp—no need to start over
  • Make fewer mistakes, saving time and money
  • Easily create 2-step, 3-step, and 4-step stamped images using reversible plates
  • Develop new and specialized stamping techniques with adjustable stamping plates and precision placement

Want to know more?

Do you need product details?  Well here they are:

  • Compatible with Stampin’ Up!’s red rubber and photopolymer stamp
  • Foam mat to use with photopolymer stamps
  • Rulers and gridlines for quick measuring
  • 2 open sides so you can stamp on larger paper
  • 2 reversible plates: a total of 4 surfaces to work with
  • 2 magnets to hold the paper in place
  • Magnet storage areas
  • Retail Price $99.00 NZD
How do I get one?
 You reserve your spot and we guarantee shipment as soon as the product arrives in our warehouse. You can reserve one during one of the “Reservation Windows”.

The global launch will feature three reservation windows. For each window, please note the following:

  • Reservation quantities are while supplies last
  • 1 tool per customer per reservation window
  • You may participate in multiple reservation windows
  • In order to reserve your Stamparatus, you are required to provide your credit card information
  • Credit cards will not be charged until the Stamparatus ships from our facility. When you close your order, be sure to verify that your credit card and shipping information is correct.
RESERVATION WINDOWS AVAILABLE TO SHIP
17–30 November 2017 Approx. 1 February 2018
6–30 December 2017 Approx. 19 March 2018
16–30 January 2018 Approx. 15 April 2018

You can order from 10am on the morning of the first date of each ‘window”.


Have more questions? We have answers. Check out the PDFs below.

Happy stamping!

Christine

Painted Harvest Hedgehog

By | 05/11/2017

Isn’t he just the cutest little chap?!

This little guy was created using the Painted Harvest Stamp set.  I can’t take credit for designer him (or her).  There are many different demonstration on You Tube on “how to”, but I just had to have a play.

Seeing him sitting in the middle of ‘bushy’ area just seems right.  For the topper this was created by using a combination of the leaves from the Painted Harvest set and the grass from the Delightful Daisy stamp set and die cut using the Stitched Shape Framelits.

The “Layered Leaves” 3D Dynamic Textured Impressions Embossing folder seemed to be just the right for this card as well, continuing the ‘bushy’ effect.

The Painted Harvest stamp set is available by itself and also with a punch as part of a bundle.

Happy stamping!

Christine

If you live in New Zealand all supplies used to create these projects can be purchased HERE.

Supplies used:
Stamp set:  Painted Harvest (2017 Holiday Catalogue), Daisy Delight, Foxy Friends (face)Heart Come Home (2017 Holiday Catalogue)

Cardstock:  Wild Wasabi, Lemon Lime Twist, Very Vanilla
Ink:  Crumb Cake, Soft Suede, Wild Wasabi, Early Espresso

Miscellaneous:  Tombow Multipurpose Liquid Glue, Stampin’ Trimmer, Big Shot, Layered Leaves Embossing Folder, Dimensionals, Stitched Shapes Framelits, Linen Thread

Year of Cheer Matchbox

By | 30/10/2017

With the 2017 Holiday Catalogue Stampin’ Up! included a number of beautiful DSP (Designer Series Paper) packs.  One of my favourites it the “Year of Cheer” Specialty DSP.  This pack included Classic foil designs perfect of all occasions including Christmas, weddings, birthdays and anniversaries.  The pack includes 12 sheets (3 each of 4 single-sided designs).

For my October papercraft class we used the Envelope Punch Board to make “matchbox” boxes embellished with “Year of Cheer” DSP.  The details and measurements for the match box were from Diane Dimich.

With such elegant paper you don’t need lots of further embellishments so I have kept it plain and simple.  Layered with a little gold foil cardstock, and a gold embossed greeting also layered on gold foil card stock.  Both the DSP and foil cardstock shines beautifully to make any project look extra special.

Happy stamping!

Christine

If you live in New Zealand all supplies used to create these projects can be purchased HERE.

Supplies used:
Stamp set:  Heart Come Home (2017 Holiday Catalogue)

Cardstock:  Whisper White, Gold Foil, Year of Cheer DSP (2017 Holiday Catalogue)
Ink:  Versamark

Miscellaneous:  Tombow Multipurpose Liquid Glue, Stampin’ Trimmer, Big Shot, Gold Embossing Powder, Dimensionals, Layer Oval Framelits, Envelope Punch Board.

Bright and Cheerful Good Tidings

By | 28/10/2017

I love the bright, fresh yet traditional look of this card.  It is just card stock, one stamp set (Good Tidings) and four ink colours – Garden Green, Always Artichoke, Real Red and Early Espresso for the sentiment.

No additional embellishments or dimension.  The two step stamping adds the dimension by itself.

For the first image for both the leaves and the berries, I stamped off first and then stamped the second image at full strength to create a 3D effect.

It also pays the stamp the greeting first and then stamp the holly randomly around it.

Happy Stamping!

Christine

If you live in New Zealand all supplies used to create these projects can be purchased HERE.

Supplies used:
Stamp set:  Good Tidings

Cardstock:  Very Vanilla, Real Red
Ink:  Garden Green, Real Red, Always Artichoke, Early Espresso

Miscellaneous:  Tombow Multipurpose Liquid Glue, Stampin’ Trimmer

Merry Patterns

By | 20/10/2017

During September and October SU! has been running a promotion for a free “Merry Patterns” stamp set for all qualifying orders or parties.  This is a great stamp set which includes a selection of festive images.

So I thought I’d show you an idea or two using this stamp set.

I have been experimenting with non traditional Christmas colours a bit lately.  Navy seems to be very popular at the moment, so I thought “why not?”.

And if you look closely you may notice the sparkle on the flames……Dazzling Diamonds strikes again…. it adds just that little extra bit of bling.

I just love the background effect, don’t you?  This was created by embossing the card stock using the Holly embossing fold, lightly touching a Versamark pad over it then sprinkling with silver embossing powder before heating with a heat tool.

Happy Stamping!

Christine

If you live in New Zealand all supplies used to create these projects can be purchased HERE.

Supplies used:
Stamp set:  Merry Patterns (2017 September/October Promotion)

Cardstock:  Night of Navy, Whisper White
Ink:  Night of Navy, Early Espresso, Crushed Curry, Always Artichoke

Miscellaneous:  Tombow Multipurpose Liquid Glue, Stampin’ Trimmer, Big Shot, Fine Tip Glue Pen, Stitched Shape Framelits, Dimensionals, Holly Embossing Folder, Silver Embossing Powder, Heat Tool.

Vintage Good Tidings

By | 05/10/2017

Often when we look to purchase a stamp set, we often consider how versatile the stamp set is and how many different ways we can use the one set to create as many variations of a project or projects.  After you have been stamping for a while, having collected a stamp set every so often, there is no reason why you can’t mix and match different stamp sets.  Sometime we re-discover an older set that we’d not used for a while or may be even have forgotten.

My project today uses a number of different stamp sets.  Can you work out how many different stamp sets have been used?   A little bit from one set and a little bit from another.  One of the advantages being that it is unlikely that anyone else and put that particular combination together, although stranger things have happened.

I started with Very Vanilla card stock, stamped the Sheet Music back ground, Timeless Textures around the edge, Good Tidings for the holly, Star of Light for the greeting and Rose Wonder for the boarder around the greeting.

I was aiming for a Victorian Vintage look with a Very Vanilla base and darker colours like Cherry Cobbler, Old Olive, Garden Green and Crumb Cake.  Not quite sure I achieved it, maybe a little extra sponging around the card front may have helped.  I still like the result.  The gold embossing of the greeting on the front and on the inside, just top it off nicely.

Happy stamping!

Christine

If you live in New Zealand all supplies used to create these projects can be purchased HERE.

Supplies used:
Stamp set:  Glad Tidings (2017 Holiday Catalogue), Rose Wonder, Star of Light, Sheet Music, Timeless Textures

Cardstock:  Very Vanilla, Cherry Cobbler, Old Olive
Ink:  Cherry Cobbler, Old Olive, Garden Green, Crumb Cake, Versa Mark, Always Artichoke

Miscellaneous:  Tombow Multipurpose Liquid Glue, Stampin’ Trimmer, Big Shot, Gold Embossing Powder, Dimensionals, Rose Wonder framelits.

Large Letter – Wild Flower Meadow

By | 27/09/2017

In previous posts I have mentioned the Creative Inkers’ Birthday club, whereby we send each other birthday cards.  I recently acquired the Large Letter Framelits and was just itching to have a play.  What better opportunity than to personalise a birthday card.  

Using the Large Letter Framelits, this card can easily be adapted to use any name (provided the name isn’t too long).  Equally you can stamp any image.  In this case, I have used some of the smaller stamps from the Daisy Delight stampset to create a wild flower look.

Once I had stamped the card front I laid out the letters on grid paper to ensure they were straight and equally spaced then placed washi tape across all other letter to hold them in place.  Then carefully laid the ‘washi taped’ letter onto the card front and run it all through the Big Shot.Large Letters Framelits Dies

To elevate the letters up, I die cut another three of each of the letters in Old Olive and carefully glued them together placing the stamped letter on the top and then place the letter stacks back into the card front.

Besides using names, you could use “Mum”, “Dad”, “Sister” and “Aunt” for example. The options are endless.

Needless to say, this card is not a standard size (8 x 4″) so the Envelope Punch Board came in really handy to make my own envelope to fit this card perfectly.

Happy stamping!

Christine

If you live in New Zealand all supplies used to create these projects can be purchased HERE.

Supplies used:
Stamp set:  Daisy Delight
Framelits:  Large Letters
Cardstock:  Whisper White, Daffodil Delight, Old Olive
Ink:  Daffodil Delight, Old Olive, Rich Razzleberry

Miscellaneous:  Tombow Multipurpose Liquid Glue, Stampin’ Trimmer, Big shot

Clear Tiny Treat Boxes

By | 12/09/2017

Have you ever needed just that little something, whether it be a modest gift, a table favour for a wedding or baby shower just to name a few.  Well, maybe Clear Tiny Treat Boxes could be the answer.

These great treat boxes come ‘flat packed’ and you just need to assemble them and decorate as you wish.

In this instance, I have cut a piece of DSP (Designer Series Paper) 15 x 5cm, scored at 5 and 10cms, popped inside the treat box, filled with treats and then topped with a bow made using the Bow Builder Punch.

This would be perfect for a baby shower, or wedding favours maybe even a teacher gift for the end of the year.

There many different options for decorating these lovely little boxes.  Perhaps wrap with ribbon and add a tag or stamp and punch a lovely flower.  For my second example I have used the Daisy Delight stamp set and punch.  You really can achieve fabulous results with minimum supplies.

Happy stamping!

Christine

If you live in New Zealand all supplies used to create these projects can be purchased HERE.

Supplies used:
Stamp set:  Daisy Delight (Annual Catalogue)

Cardstock:  Blushing Bride, Whisper white, Daffodil Delight
Designer Series Paper:  Fresh Florals, Delightful Daisy
Ink:  Night of Navy, Daffodil Delight

Miscellaneous:  Clear Tiny Treat Boxes, Tombow Multipurpose Liquid Glue, Dimensionals, Bow Builder Punch, Daisy Punch

More Good Tidings

By | 08/09/2017

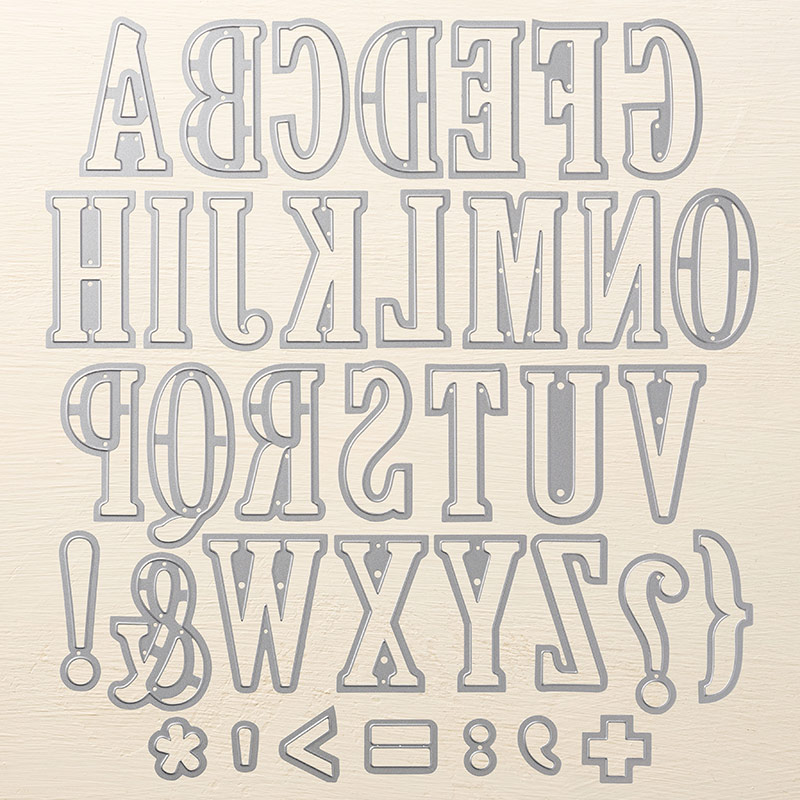
I really have had fun playing with this stamp set.  At the time of making this card the set had only just become available to demonstrators so there were no projects on the internet using this set.  Often I get inspiration from other demonstrators but in this instance, that wasn’t an option.

I started with the “Sheet Music” background stamp, then the holly and finally the greeting.

The holly and the berries have a 3D effect which is created using the two step process.  Placement of the second layer can be a little tricky but the use of a Stampa-ma-jig made it easy.

To make the greeting pop just a little, I covered the stamp with Versamark, then Real Red Ink before stamping it onto the card and then adding clear embossing powder and heat setting.  This gives it a shiny, embossed finish.

The 3/8″ Metallic-Edge ribbon is just lovely.  In this instance I have used the Very Vanilla with the Gold Trim but you can also purchase Whisper White with silver trim.

Happy stamping!

Christine

If you live in New Zealand all supplies used to create these projects can be purchased HERE.

Supplies used:
Stamp set:  Glad Tidings (2017 Holiday Catalogue), Sheet Music (Annual Catalogue)

Cardstock:  Very Vanilla
Ink:  Real Red, Cherry Cobbler, Garden Green, Sahara Sand, Versa Mark

Miscellaneous:  Tombow Multipurpose Liquid Glue, Stampin’ Trimmer, Gold Embossing Powder, Dimensionals