Flourishing Phrases – Teachers Gift

By | 16/12/2016

flourishing-phrases-teacher-gift flourishing-phrases-teachers-gift-box flourishing-phrases-teachers-gift-mk2

With the end of the school year comes the usual panic for gifts for those fabulous teachers and this year was no except for us.  I had made up a selection of cards similar to a card I posted a few days ago, but in different colours.  My daughter then asked if we could do a candle to match, then we also added a coordinating Bakers Box with a few chocolates.  Bundled up in the new cellophane bags, tied with ribbon and matching tag.  Job done.  It was lovely crafting with my daughter.

flourishing-phrases-teachers-gift

Happy Stamping!

Christine

If you live in New Zealand all supplies used to create these projects can be purchased HERE.

Supplies used:-
Stamp set:  Flourishing Phrases
Framelits:  Layer Ovals
Card & Ink:  Whisper White, Melon Mambo, Emerald Envy, Dapper Denim
Embellishments:  Whisper White Organza Ribbon
Miscellaneous:  6 x 17″ Gusseted Cellophane Bags, Window Sheets, Multipurpose Liquid Glue.

Kiwi Twist – Ferrero Rocher Chocolate Box

By | 08/12/2016

silver-fern-box silver-fern-mk2

This morning I have fabulous sturdy box cas’d from Linda Parker but with a Kiwi twist.  I have stamped the fern from Butterfly Basics with Versamark ink and then silver embossed to represent the New Zealand Silver Fern.  The box and the lid are reinforced for extra strength the sturdiness.  While I have filled it with sweets, this box is the perfect size for 3 Ferrero Rocher Chocolates.

If you haven’t tried heat embossing, you are in for a treat.  It is a very simple technique and gives a professional finish.  Once you have selected the image you wish to emboss, rub the card stock with an Embossing Buddy (this removes any static from the card stock), ink up your stamp with Versamark ink and stamp the image onto the card stock.  Sprinkle over your chosen embossing powder, flick off the excess and then heat with a Heat Tool until the powder melts.

There are a number of very effective techniques that can be done using heat embossing and I hope to demonstrate some of those over the next few weeks.

Happy stamping!

Christine

If you live in New Zealand all supplies used to create these projects can be purchased HERE.

Supplies used:-
Stamp set:  Butterfly Basics
Card & Ink:  Basic Black, Versamark
Embellishments:  Pearl Basic Jewels
Miscellaneous:  Embossing Buddy, Silver Embossing Powder, Tear and Tape, Scoring Tool. Heat Tool, Silver 1/8″Ribbon.

Sweet Cupcake Card in a Box

By | 05/12/2016

sweet-cup-card-in-a-box

A very special young lady had a birthday a few days ago and she received a few handmade cards.  The first one was inspired by Stampin by Hannah.  My measurements are different and are designed to make a flat card that fits into an envelope that is A5 sized, approximately.  Basically I used an A4 piece of card stock, scored landscape every 1 3/4″ thus leaving me with 4 sides and a tiny strip for adhesive.  Then scored portrait at 4 1/2″.

I didn’t have appropriate Designer Series Paper so I made my own using Blushing Bride card stock and stamped Gorgeous Grunge in Rose Red ink.  You may also be able to see the layer underneath is stamped with Garden in Bloom.  The cupcakes (all 10 of them) are stamped individually using the two step stamp set call Sweet Cupcake, the numbers and greetings are from Number of Years.

swirly-bird-butterfly

This card was from Nana.  I just love the pastel colour combination finished off beautifully with Basic Pearls.  You probably can’t tell from the photo but the butterflies are cover with Wink of Stella and sparkle ever so prettily.

Happy Stamping!

Christine

If you live in New Zealand all supplies used to create these projects can be purchased HERE.

Supplies used:-
Stamp set:  Sweet Cupcake, Number of Years, Gorgeous Grunge, Butterfly Basics
Thinlits/Framelits:  Cupcake Cutouts, Large Numbers, Swirly Scribbles
Card & Ink:  Whisper White, Rose Red, Blushing Bride, Tip Tip Taupe, Sahara Sand
Embellishments:  Dazzling Diamond, Wink of Stella, Pearl Basic Jewels
 

Flourishing Phrases

By | 22/11/2016
florishing-phrases-5

Flourishing Phrases

I must admit I was hesitated to purchase this set, but I decided to take the plunge and give it a go and I’m glad I did.  It’s a very versatile set with many lovely sentiments and greetings.

For this card, I stamped the image once in the corner using Dapper Denim ink pad on Whisper White Card stock and then using a Blender Pen I coloured in the flowers and leaves.  For the sentiment, I patted the stamp in firstly Versa Mark and then Dapper Denim ink pad before stamping on the card stock, covering it with Clear Embossing Powder and heat setting with the Heat Tool.  Using this technique you can heat emboss any Stampin’ Up! ink colour, giving your project a professional looking finish.

Then layering on a Dapper Denim matt and then on Whisper White card base.

I think this is a simple, fresh looking card that can be easily reproduced in a variety of colours and would make a lovely gift.  I do recommend that you try various ink colours with the Blender Pens as they give different results.

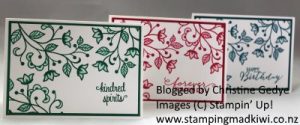
And to show some of the versatility of this set:-

florishing-phrases-2

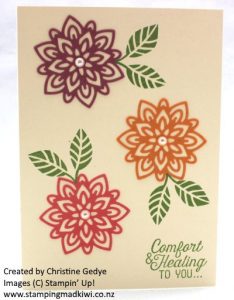
This is probably one of the easiest cards possible and it is soooo pretty.  Each of the flowers are die cut using Sweet Sugarplum, Peek-a-boo Peach and Flirty Flamingo card stocks on the Big Shot with Flourish Thinlits.  The leaves and the greeting are stamped directly on the Very Vanilla card base using Wild Wasabi ink pad.  Finished with Pearl Basic Jewels.  How could it be any easier!

florishing-phrases-3    florishing-phrases-4

And for that little touch of class – the flower image stamped in Sahara Sand and the greetings are Gold heat embossed on Very Vanilla Card stock, mounted on Sahara Sand and then on Very Vanilla card base.  The photos just do not do it justice.  Simple, elegant and understated….. in my opinion anyway.

Happy Stamping!

Christine

If you live in New Zealand all supplies used to create these projects can be purchased HERE.

Supplies used:-
Stamp set:  Flourishing Phrases
Thinlits:  Flourish Thinlits
Card & Ink:  Whisper White, Dapper Denim, Very Vanilla, Sweet Sugarplum, Peek-a-boo Peach, Flirty Flamingo, Sahara Sand, Versa Mark
Embellishments:  Pearl Basic Jewels
Miscellaneous:  Blender Pens, Multipurpose Liquid Glue, Fine Tip Glue Pen, Gold Embossing Powder.

Auckland Extravaganza – November 2016

By | 14/11/2016

This past Saturday I had the privilege for teaching at the Auckland Extravaganza.  Despite having been told at 4.30pm the afternoon before hand that our venue had been double booked, the team were able to pull a fabulous afternoon of paper crafting.  This is a truly wonderful team that pulled together and found alternative venues, sorted tables and seating for 120 customers with very little notice and the afternoon went off without a hitch.

There were five groups of three demonstrators each, teaching five fabulous projects.  This along with door prizes, afternoon tea and Stampin’ Up! displays made for a great afternoon enjoyed by all.

cookie-cutter-peek-a-boo-card

The project I helped to teach, features the Cookie Cutter Christmas Bundle along with the Tin of Tags Stamp set (a very versatile stamp set for more than just tags) and the Presents & Pinecones Designer series paper.  This kind of card is commonly known as a “peek-a-boo” card – as you open it, the picture of Rudolph is replaced by a festive sentiment.

cookie-cutter-peek-a-boo-card-mk2         cookie-cutter-peek-a-boo-card-mk3

The next Extravaganza is expected to be around early March next year.  I will keep you updated with the details as they become available.

The Cookie Cutter stamp set and matching punch is very versatile and can be used for a variety of projects.  Here a just a few ideas:-

How about a baby card?

cuttie-cutter-baby-card          cuttie-cutter-baby-card-mk2

Maybe a Treat box?

cookie-cutter-santa-mk2 cookie-cutter-santa-treat-box-mk3

Happy Stamping!

Christine

If you live in New Zealand all supplies used to create the Peek-a-boo card can be purchased HERE.

Supplies used:-
Stamp set:  Cookie Cutter Christmas, Tin of Tags
Punches:  2″ Circle , Cookie Cutter, 1/2″ Circle
Cardstock:  Thick Whisper White, Emerald Envy or Real Red, Red Glimmer Paper, Window Sheet
Designer Series Paper:  Presents & Pinecones
Embellishments:  Christmas Trinkets
Miscellaneous:  Fast Fuse, Tear ‘n Tape, Multipurpose Liquid Glue, Linen Thread, 3/8″ Silky Taffeta Ribbon

On Stage Live – Brisbane 2016

By | 09/11/2016

This was my first big ‘live’ event with Stampin’ Up! and this time it was in Brisbane.  What a wonderful time we all had. Three days of motivational talks, new product demonstrations, stamping projects, business ideas and international awards (New Zealand was very well represented).

I had opportunity to meet demonstrators from around the world who share a common interest.  Ultimately we were all there for fun, and fun we had.  We even had a sneak preview of the upcoming Occasions Catalogue…. not sure I have ever heard sooooo many “ooooos” and “arrhhhhs” and excited squeals.

on-stage-2016-shelli-mk2     on-stage-2016-sara-mk3

We were also privileged to have the opportunity to meet Shelli Gardner (Stampin’ Up! Cofounder and Board Chair) and her daughter, Sara Douglass (Stampin’ Up! CEO) who had travelled  from Utah along with Rich Judkins, Shannon West and a large contingent of Stampin’ Up! staff from home office.

Having now returned home, I’m very motivated to get things moving and I look forward to what the future may bring.

Happy Stamping!

Christine

If you live in New Zealand and wish to purchase any Stampin’ Up! products you can do so HERE.

Star of Light

By | 08/11/2016

Today’s card uses the beautiful Star of Light stamp set and matching Starlight Thinlit Dies and is my take on a card by Kimberly van Diepen.  I love how the stamp set is not only used for the focal embellishment but also the back ground.  The colour combination and addition of a little bling (can’t get bye without the bling) present a non traditional yet still festive card.

Happy stamping.

Christine

If you live in New Zealand all supplies used to create this project can be purchased HERE.

Supplies used:-
Stamp set:  Star of Light
Thinlits:  Starlight
Cardstock:  Whisper White, Dapper Denim, Soft Sky, Gold Glimmer Paper
Embellishments:  Metallics Sequin Assortment, Gold Metallic Thread, Rhinestone Basic Jewels
Miscellaneous:  Stampin’ Dimensionsals, Multipurpose Liquid Glue, Fine Tip Glue Pen.

Bliss & Blooms – Twist & Pop Card

By | 07/11/2016

Well, here I am taking my first tentative steps into the world of social media after procrastinating for three years.  My journey so far with Stampin’ Up! has been amazing.  I’ve done things I never thought I’d do and meet many wonderful people from New Zealand and around the world.  This blog is the next step in my journey.  Being a bit of a technophobe I suspect it will be steep learning curve, but here I go…..

The first project I’m choosing to share is this pretty card which uses Blooms & Bliss Designer Series Paper and features Watercolor Wings Stamp set.  As you open the card, the inside pops out and opens with a twist to reveal a secret and was CAS’d the mechanism from Kevin Devine but I worked it out in centimetres using standard A4 cardstock (the USA uses different size cardstock).

watercolour-wings-pop-up-twist-cardwatercolor-wings-mk4

I particularly love the Watercolor Wings stamp set and the detail that the ‘two step stamping’ provides.  Here I’ve used Mint Macaron, Island Indigo but the colour combinations are endless.  My colour inspiration came from the Blooms & Bliss Designer Series Paper which I absolutely adore.

Happy Stamping!

Christine

If you live in New Zealand all supplies used to create this project can be purchased HERE.

Supplies Used:  
Stamp sets:  Watercolor Wings, Blooms & Bliss
Framelits/Thinlits:  Layering Oval Framelits, Bold Butterfly Framelits
Cardstock/Ink pads:  Mint Macaron, Island Indigo, Sahara Sand
Miscellaneous:  Scoring Tool, Multipurpose Liquid Glue