Dapper Denim – Shaving Foam Technique

By | 08/06/2017

I think of this as the technique that keeps on giving.   In my post from 29 May, I showed you some thank you cards that I made using a background effect created by drops of re-inker in shaving form.

Well, while I was playing with the shaving foam, I thought I might as well create as much as possible to make the most of the supplies used and here are some of the projects I came up with.  And dare I say it, I have plenty more so there may be more in the future.  It’s worth noting that while I say there are more, the technique gives you a different result every time.

For this first project I have just adhered onto a Dapper Denim cardbase and topped it with a stamped image from the Beautiful You stamp set, die cut using the Layer Ovals framelits, and the Silver Foil Trim is die cut using the Flourishing Phrases thinlits.  Given the detail in the back ground I feel a simple topper is all that is required.

To colour the image, I used Stampin’ Up! Watercolour Pencils for her skin however the pencils didn’t have just the right colour for her dress.  So in this instance I used a blender pen to pick up ink colour from a Dapper Denim Stamp pad and applied it to the image.

Being someone who is known for being a little frugal with supplies you may notice I have used a narrow off cut to decorate the edge of the insert just to tie it all together.

Happy stamping!

Christine

If you live in New Zealand all supplies used to create these projects can be purchased HERE.

Supplies used:
Stamp set:  Beautiful You

Thinlits/Framelits:  Layer Ovals
Cardstock:  Whisper White, Night of Navy, Silver Foil
Ink:  Dapper Denim, Pool Party

Miscellaneous:  Tombow Multipurpose Liquid Glue, Big Shot, Shaving Form
Non Stampin’ Up! Supplies:  Shaving Foam

Colourful Seasons – May Team Swap

By | 03/06/2017

One of my favourite suites from the new 2017/18 Annual Catalogue is the Colour Theory Suite.  I have looked at it longingly in the catalogue for some time.  At this point I only have the stamp set, Colourful Seasons but do plan to purchase the matching Seasonal Layers thinlit dies and the Colour Theory DSP when I am able.

In the meantime, I had to come up with a swap for the Creative Inkers’ May team training event with just the stamp set.  What to do?…..

Looking at the Colourful Seasons stamp set it is clearly designed to cover the various seasons throughout the year – snow flakes, spring blossoms, deck chairs, cocktail beverages and autumn leaves.  The autumn leave got me thinking about the changing colours of the leaves ….  You never know where the inspiration may strike.

In order to achieve the variegated colours, I used the ‘baby wipe’ technique.  Take a baby wipe or two and fold them to create a ‘stamp pad’, using Stampin’ Up! reinkers drop a few colours onto the baby wipe, letting them blend a little and voila!  Stamp away.  I covered a full A4 sheet of Very Vanilla and them trimmed and matted onto a Very Vanilla Card base.

Then wondered if it needed just a little bit more.  So then I added the outline stamp which is also in the stamp set to cover some of the ‘white space’ on the topper and a little bling on the left hand top corner. Which do you prefer?

Quick, easy and inexpensive way to make a number of cards.  For the swap event, I needed to make 22 cards all the same…. this was one of the quickest swaps I have made for a long time.  I am looking forward to creating more projects with the other stamps in the set along with the matching thinlits.

If you are keen on the stamp set and the matching thinlits, these can be purchased as a bundle, saving 10% what a bargain.  Particularly as this is such a versatile set.  I’m already thinking Christmas Cards whether you celebrate Christmas in summer, like we do here in New Zealand or winter as in the northern hemisphere, you’re covered.

If you haven’t seen the new 2017/18 Stampin’ Up! Catalogue you can download a copy HERE.

Happy stamping!

Christine

If you live in New Zealand all supplies used to create these projects can be purchased HERE.

Supplies used:-
Stamp set:  143726 Colorful Seasons,
Cardstock:  106550 Very Vanilla, 108599 Chocolate Chip
Ink:  131173 Crush Curry, 126946 Tangerine Tango, 126983 Calypso Coral, 126945 Pumpkin Pie, 126995 Cajun Craze, 126979 Chocolate Chip

Miscellaneous:  110755 Multipurpose Liquid glue, 129722 Stampin’ Trimmer

Shaving Foam Technique – 3×3 Thank You cards

By | 29/05/2017

For my May thank you cards I thought I’d have a go at the Shaving foam technique.

This is technique has been around for a long time but this is the first time I have tried it.  Why didn’t I try it sooner?  I don’t know.  The results are fascinating and different every time.  I’m looking forward to experimenting with different colour combinations.  Just a wee warning….. have lots of paper towels to hand.

There are many videos on the internet explaining how it’s done, but basically you cover a plastic plate (or similar) with shaving foam (not gel).  Smooth the foam a little with a knife or spatula, and add a few crops of Stampin’ Up! re-inker, one or more colours into the foam. I then used a bamboo skewer to run through the ink drop in different direction before laying pieces of cardstock onto the surface.  Press down gently and the lift and wipe dry with a paper towel.  Leave it to dry for while, then use as you wish.

My daughter and I had a lovely, messy time creating many different backgrounds using the same shaving foam and ink colours.  Mixing them a little more, adding more colour, adding another colour.  For these cards we started out with Pool Party and Dapper Denim and after a few we added Perfect Plum.  Each and everyone came out differently.

To be fair, the colours in these examples have been mixed quite a bit, hence the colours are quite mixed.  I am planning to make projects with the first few and hope to show you later.

For the card itself I have cut the shaving foam background using the Stitched framelit dies and mounted onto a Night of Navy card base.  I then added a butterfly from the Bold Butterfly and Butterfly Thinlits dies using Silver Foil card stock and Vellum topped with Rhinestone Basic Jewels.

The background speaks for itself so a simple embellishment to just top it off is all that is needed.

Happy stamping!

Christine

If you live in New Zealand all supplies used to create these projects can be purchased HERE.

Supplies used:-
Thinlits/Framelits:  Butterfly thinlits, Bold Butterfly, Stitiched Shape framelits
Cardstock:  Whisper White, Night of Navy, Silver Foil, Vellum
Ink:  Dapper Denim, Pool Party, Perfect Plum

Miscellaneous:  Rhinestone Basic Jewels, Tombow Multipurpose Liquid Glue, Big Shot

Mixed Borders – Thank You

By | 27/05/2017

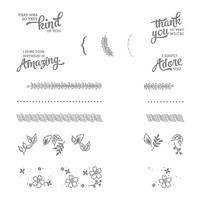
When I first saw the Mixed Borders stamp set in the catalogue I didn’t really give it a second thought.  However I was at a Stampin’ Up! event and saw it demonstrated only to discover that the various stamps are designed to work together at part of a two-step stamp technique plus mix and match greetings.

I have stamped a strip of Whisper White card stock with the Mixed Borders stamp set, first the leaves with Wild Wasabi ink and then the flowers with Elegant Eggplant.  Layered this up onto a slight larger strip of Elegant Eggplant card stock and adhere across the centre of the Whisper White mat (embossed with the Brick Wall embossing fold) on and Elegant Eggplant cardbase.

The greeting was stamped and mounted on card stock die cut using the Tags & Labels Framelits.  These framelits are great as the are two different shaped tags in a variety of sizes designed to layer beautifully for the perfect mat.

Topped of with a floral embellishment (Botanical Builders Framelits), again with Elegant Eggplant, Wild Wasabi, a little Smokey Slate and a little bling.Mixed Borders Photopolymer Stamp Set

This stamp set is retiring as at 30 May 2017 and is on discount as part of the retiring list, so a great deal to be had.

Happy stamping!

Christine

If you live in New Zealand all supplies used to create these projects can be purchased HERE.

Supplies used:-
Stamp set:  Mixed Borders
Framelits:  Botanical Blooms, Tags & Labels

Cardstock:  Whisper White, Elegant Eggplant, Smokey Slate, Wild Wasabi
Ink:  Elegant Eggplant, Smokey Slate

Miscellaneous:  Wink of Stella, Rhinestone Basic Jewels, Big Shot, Magnetic Platform, Multipurpose Liquid glue, Dimsenionals.

Elegant Curvy Keepsake

By | 24/05/2017

The 2016/17 Annual Catalogue will finish very shortly and I am rushing to show you some the products that I haven’t shown you previously before it’s too late.

This is one of my favourite all time dies and will really miss it once it’s gone (30 May 2017).  I have seen so many fabulous gift boxes made using the Curvy Keepsake Box Thinlits, everything from Minions, Santas, Chickens, Dogs, even Star Wars Storm Troopers, you name, you can do it.

Anyway, for my project I thought I’d try something a little more on the elegant side.  What do you think?  To be honest, I love them but I am probably a little bias.  I think they would make lovely wedding favours perhaps in the same colours as the wedding party.

For the first box  I have used Island Indigo Cardstock, Blooms and Bliss Designer Series Paper, Mint Macaron Cardstock for the flowers, Pearl Basic Jewels, Silver Sequin Trim.

And for the second box I have used Rich Razzleberry Cardstock, Sweet Sugar Plum Cardstock along with the Blooms and Bliss Designer Series Paper.

For both of the boxes, the flowers were cut using one of the smaller dies in the Bloomin’ Heart Thinlits.  They seemed to be just the right size.

I love the rich colours and the co-ordinating paper and ink.  It take the guess work out of it. Finishing of with just that little bit of bling.

To create the main box you need to die cut two of the larger shapes and adhere them at the base.  I also used the die to cut some matching designer series paper on just one side of each of the two pieces.  The Curvy Keepsake framelit set also include three different shaped tags to co-ordinate with the main die to create personalised gift boxes.

These really are very versatile boxes for all occasions.  These framelits are retiring as at 30 May 2017 so be in quickly to get yours.

Happy stamping!

Christine

If you live in New Zealand all supplies used to create these projects can be purchased HERE.

Supplies used:-
Thinlits/Framelits:  Curvy Keepsake, Bloomin’ Heart

Card stock:  Island Indigo, Mint Macaron, Rich Razzleberry, Sweet Sugar Plum
Ink:  Mint Macaron, Sweet Sugar Plum

Embellishments:  Silver Sequin Trim, Pearl Basic Jewels
Miscellaneous:  Multipurpose Liquid Glue, Big Shot, Glue Dots.

Cheesey Cutie Pie Thinlits

By | 21/05/2017

I taught today’s project at a class quite some time ago and it proved to be very popular. I realised that I hadn’t posted it and as the die and the punch used are about to retire, I thought I’d better get onto it.

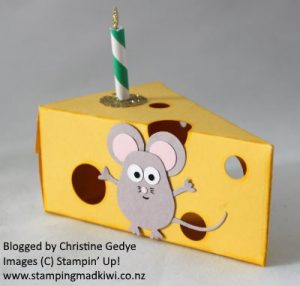
I cas’d this project from Janina’s Paper Potpouri.  I just thought it was so cute.

The ‘cheese’ is cut from Daffodil Delight cardstock using the Cutie Pie Thinlits, with holes randomly punched using a variety of circle punches, then sponged with Daffodil Delight ink around the edges of the cheese and the holes.

The candle is cut from Gold Glimmer paper, also using dies from the Cutie Pie Thinlits and topped using a small piece of the paper drinking straw.

And then there’s the mouse.  Isn’t he so cute?  Most of the bits used to create this wee fellow comes from the Owl Builder Punch.  I think the only exception is the large Smokey Slate circles used to create the ear.  From memory that was done using the 3/4″ circle punch.

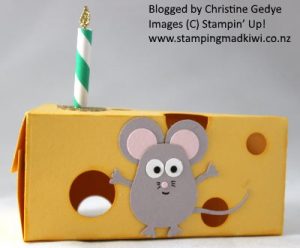
The body is created using the body for the Owl Builder punch but with the pointy ears trimmed off.  The ‘arms’ (or are they paws?) are cut from a second body using the feet for the hands and cutting into the body to create ‘arms’.

To create the tail I have used the piece of card that I cut one of the bodies from and positioned the punch in the same place but very slightly offset to create a very narrow, curvy tail….. I hope that make sense.

If you are would like the Cutie Pie Dies (and there is a matching stamp set that I haven’t used here) or the Owl Builder Punch (which can be used to create so much more) please be quick as these products will be retiring as at 30 May 2017.

Cutie Pie Thinlits Dies

The Cutie Pie thinlit set comes with an assortment of smaller dies such as candles, tags, flowers, bows and many more, to enable you to create a number of embellishments to dress up your cake/cheese slice.

Happy stamping!

Christine

If you live in New Zealand all supplies used to create these projects can be purchased HERE.

Supplies used:-
Framelits/Thinlits:  Cutie Pie

Cardstock:  Daffodil Delight, Smokey Slate, Blushing Bride, Whisper White, Gold Glimmer Paper
Ink:  Daffodil Delight

Miscellaneous:  Cutie Pie Thinlits, Owl Builder Punch, 1/2″ Circle Punch, 3/4″ Circle Punch, 1″ Circle Punch Tombow Multipurpose Liquid glue, Big Shot.

Eastern Palace Suite – Early Release

By | 30/04/2017

We all love a sneak peek, don’t we?  Well, here are, introducing the Eastern Palace Suite which you can your from 1-30 May, prior to the official 2017-2018 Catalogue launch.

The suite can be purchased either one of two bundles.  Amongst  other fabulous products the bundles include 3 of the new In Color Inkpads – Lucky Lime Twist, Fresh Fig and Tranquil Tide.  Also introducing thick Very Vanilla Cardstock for the stronger card bases.  For details of the bundles, please click on the image above, or HERE.

If you wish to purchase, either of the bundles please click HERE.

Happy Stamping!

Christine

Creative Inker’s Birthday Wishes

By | 23/04/2017

I am fortunate enough to not only be an Independent Stampin’ Up! demonstrator, but also am part of the Creative Inker’s group.  This is a group of very supportive and social women with similar interests.  We get together on a regular basis at a number of different occasions such as Team Training, Stamp Camp, Extravaganzas and On Stage Events.

As part of this group, we have set up a Birthday Card Club where by we send each other birthday cards on their birthday.  Well, April is my birthday month and I received around 30 birthday cards in the post…… I bet the postie was wondering what was going on.  I know my neighbours certainly did as we were away at the time and they were clearing our mail box.

So for today’s post I thought I’d show you just a few of the cards I received.  They are all wonderful but here are just a few examples.  So many different cards, different styles and colours.

In this day and age, sending a quick text or e-mail to wish people a Happy Birthday seems the easiest option, but nothing competes with receiving a beautiful handmade card in the post.  You can put in as much or a little effort as you wish in making your own cards.

If you think you would like to sign up with Stampin’ Up! and become part of the wonderful Creative Inker’s team then I would love to have you as part of my team.  If you have any questions (no obligation) please feel free to contact me HERE.

Happy stamping!

Christine

If you live in New Zealand all supplies used to create these projects can be purchased HERE.

Rose Wonder – Floating Watercolour

By | 17/04/2017

Today’s card I made quite some time ago but thought I’d share it with you as it is a good example (in my opinion) of the floating watercolour technique.  Plus it just happens to be a pretty card suitable for many occasions.

In this instance, I have heat embossed the rose from the Rose Wonder Stamp set using white embossing powder onto Shimmery White card stock.  This card stock has an ever so slightly sparkly surface and works well with watercolouring.  I have then spritzed it with water so that it pools within in the different sections of the image.  Using an aqua painter, I have picked up ink colours and dropped them carefully into each of the ‘pools’.  The ink colour will move by itself and fill in the segments and just seems to settle in the right spot.  It may look a little bit of a mess to start with, but once it is dry it all seems to come right.

The colours used for the rose were Night of Navy, Marina Mist and Tempting Turquoise and for the leaves Pear Pizzazz and Garden Green.  But you can use a variety of colour combinations for different result, each card will be different.

What about trying Daffodil Delight, Pumpkin Pie and Calypso Coral, or Blushing Bride, Melon Mambo and Rich Razzleberry, for example.  There are not limits to possible colour options.

Rose Wonder Photopolymer Stamp SetOnce the image is thoroughly dry, I have fussy cut it out and using dimensionals, adhered onto a Whisper White card stock which has been stamped with Timeless Textures and Smokey Slate, and mounted onto a Smokey Slate card base.

This is a very versatile stamp set with a number of greetings for all occasions in great fonts and the large open rose stamp is perfect for a number of different techniques.

Happy stamping!

Christine

If you live in New Zealand all supplies used to create these projects can be purchased HERE.

Supplies used:-
Stamp set:  Rose Wonder, Timeless Textures
Cardstock:  Shimmery White, Whisper White, Smokey Slate
Ink:  Night of Navy, Marina Mist, Tempting Turquoise, Smoke Slate, Versa Mark

Miscellaneous:  White Embossing Powder, Embossing Buddy, Aqua Painter Brush, Multipurpose Liquid glue.

Floral Phrases

By | 09/04/2017

Today’s cards uses Bermuda Bay (one of my favourite colours) cardstock, Inkpad and ribbon….. oh the joy of having colour co-ordinating products.  You never need worry about matching components of projects again.

This card is very easily created using the Detailed Floral Thinlits dies from Stampin’ Up!  The set includes three dies – two floral images and an outline image.  In this instance, I have only used the floral images on Whisper White card stock and then adhered to Bermuda Bay card base but you could use any colour of your choice.

The greeting is from the co-ordinating Floral Phrases stamp set which can be purchased as part of a ‘bundle’ with the Detailed Floral Thinlits. to save 10%.

To shift if up a notch, you can rotate the Details Floral Thinlet and use the edging die to create a slightly different effect.  

Which do you prefer?

Happy stamping!

Christine

If you live in New Zealand all supplies used to create these projects can be purchased HERE.

Supplies used:-
Stamp set:  Floral Phrases
Thinlits/Framelits:  Detailed Floral Thinlits

Card stock:  Bermuda Bay, Whisper White
Ink:  Bermuda Bay

Embellishments:  Bermuda Bay 1/8″ Stitched Ribbon
Miscellaneous:  Multipurpose Liquid Glue, Big Shot.